
When you first connect an audio interface, it should feel like opening a musical instrument—not reading a technical manual. The goal is simple: plug in, capture sound, and start creating.
That’s exactly the spirit behind the Harrison 32Ci from iCON Pro Audio.
This guide walks you through how to set up the 32Ci, understand its controls, and use its unique Harrison 32C filters and monitoring features to shape your sound before it even reaches your DAW. Whether you’re recording vocals, guitars, synths, or full productions, this interface is built to give you classic analog tone with modern digital workflow.
Let’s walk through everything—from connections to monitoring to tone shaping.
The Harrison 32Ci is a USB-C audio interface built around Harrison’s legendary 32C console preamp design. It combines:
Harrison 32C microphone preamps
High-fidelity 24-bit / 192 kHz conversion
Flexible monitoring controls
Hardware filters inspired by the Harrison 32C console
Expandable I/O and mobile recording support
The result is an interface designed for professional studios, home producers, and creators building their first recording setup.
Before recording your first track, it helps to understand how everything connects. The back panel is where the core of your studio wiring happens.
Inputs 1 and 2 use XLR-to-¼” combo jacks with Harrison 32C preamps.
These preamps deliver:
Warm musical tone
Smooth transient response
Excellent detail for vocals and instruments
They are ideal for:
Vocal microphones
Acoustic instruments
Guitar and bass through DI
Any source needing a microphone preamp
The Line Input Switch allows you to toggle between:
+4 dBu – professional studio gear
-10 dBV – consumer level equipment
This ensures compatibility with a wide range of devices.
Inputs 3 and 4 are ¼” TRS line inputs.
These are perfect for connecting:
Synthesizers
Drum machines
External processors
Any line-level audio source
If you produce electronic music or work with hardware instruments, these inputs give you quick access to your gear.
Your Main Outputs use balanced ¼” TRS connectors to connect your primary studio monitors.
The interface also includes Alternate Outputs, which allow you to connect a second pair of monitors.
This makes A/B monitor comparison easy, helping you check how your mix translates between speakers.
The interface includes full-size 5-pin MIDI In and Out ports.
This allows seamless integration with:
MIDI controllers
Hardware synthesizers
Drum machines
External MIDI devices
For producers who combine software and hardware instruments, this keeps everything synchronized.
The ADAT optical input and output allow the system to expand with up to eight additional inputs.
This is especially useful when recording:
Drum kits with multiple microphones
Bands or ensembles
Larger recording sessions
With ADAT expansion, the 32Ci can grow with your studio.
The USB-C port connects the interface directly to your computer.
This connection provides:
High-speed data transfer
Low-latency performance
Reliable audio streaming
Once connected, your DAW recognizes the interface as your main recording device.
The OTG port allows the interface to connect directly to mobile devices.
This makes it possible to capture high-quality recordings on the go, turning a mobile device into a portable recording setup.
The interface is powered using the included power adapter via the barrel power port.
This ensures stable power for:
Preamps
converters
monitoring circuitry
Getting started with the 32Ci is simple. Follow this order:
Connect the power adapter
Plug the USB-C cable into your computer
Connect your studio monitors to the main outputs
Plug in your microphone or instrument
Once connected, the interface is ready for recording.
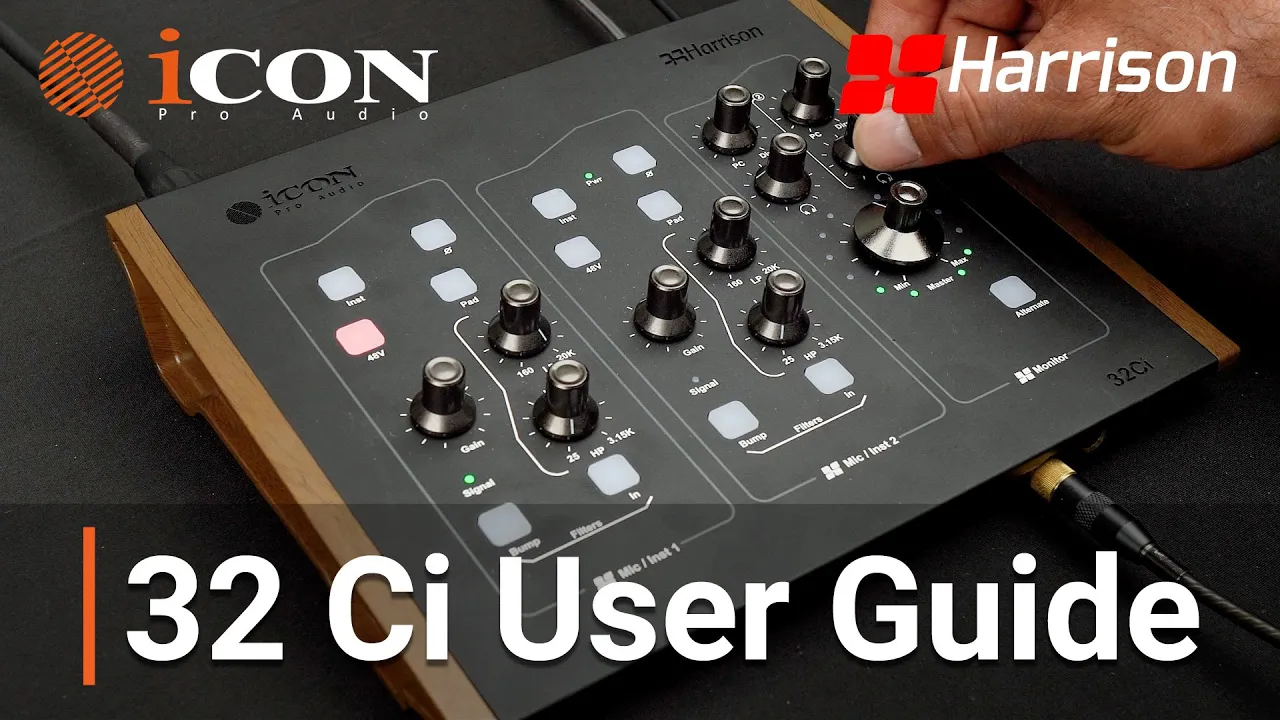
The top panel is where recording control happens. Each knob and button helps you shape and monitor your sound.
Each preamp includes a dedicated gain knob.
Next to the gain control are signal indicator LEDs that show your recording level.
Green – healthy signal
Yellow – approaching peak
Red – clipping
If you see red, simply reduce the gain to prevent distortion.
The 48V button enables phantom power.
This is required for condenser microphones.
Important note:
If you are using a ribbon microphone, phantom power should remain off to avoid damaging the microphone.
The Instrument button adjusts impedance to allow direct connection of guitars and basses.
This means you can plug your instrument straight into the interface without needing an external DI box.
The Phase Inversion button flips the polarity of the signal.
This is especially useful when recording with multiple microphones, such as:
top and bottom snare microphones
multi-mic guitar cabinets
It helps prevent phase cancellation that can weaken your sound.
If a signal is too loud, the PAD button reduces input gain by 20 dB.
This helps prevent clipping when recording loud sources such as:
drum microphones
high-output instruments
hot line signals
One of the standout features of the 32Ci is its Harrison 32C filter section, inspired by the legendary Harrison 32C mixing console.
These filters allow you to shape your tone before it reaches your DAW.
The High-Pass Filter removes unwanted low-frequency rumble.
This helps clean up recordings by removing:
room rumble
handling noise
low-end buildup
The Low-Pass Filter removes harsh high frequencies.
This can smooth out:
overly bright sources
harsh digital edges
unwanted high-frequency noise
The Bump button adds subtle low-end warmth just before the cutoff frequency.
This creates a musical boost that enhances bass response while still controlling low-frequency clutter.
Together, these filters give you precise tonal control directly from the interface.
Latency can interrupt creative flow. The 32Ci solves this with direct monitoring controls.
The PC Direct Mix knob controls how you hear your audio.
You can choose between three monitoring styles:
Fully Right – Direct Monitoring
Hear your input directly
Zero latency
Middle Position – Blend
Mix of input signal and computer playback
Ideal for overdubbing
Fully Left – Computer Playback
Hear only the audio from your DAW
This flexible monitoring control helps artists and engineers work comfortably during recording sessions.
The interface includes two independent headphone outputs, each with its own volume control.
This is perfect for collaboration sessions, allowing:
the engineer to monitor one mix
the performer to monitor another listening level
Everyone hears what they need without compromise.
The Master Volume knob controls the overall level of your studio monitors.
The Alternate Monitor button allows you to quickly switch between two speaker sets.
This makes A/B mix comparisons fast and easy, helping you evaluate how your mix translates across different speakers.
The 32Ci includes access to IO Pro software, a powerful virtual mixer and plug-in host.
With IO Pro you can:
Route audio between multiple sources
Run third-party VST and AU plugins in real time
Save preferred plugin chains as presets
This allows you to build custom signal chains and recall them quickly for future sessions.
To install IO Pro:
Visit the iCON Pro Audio website
Go to the Download section
Install the latest version
Windows users should follow the prompts to install the ASIO driver during setup.
Here are the key things to remember when using the Harrison 32Ci:
Inputs 1–2 include Harrison 32C preamps for microphones and instruments
Inputs 3–4 support line-level gear like synths and drum machines
Direct monitoring allows zero-latency recording
HPF, LPF, and Bump filters shape tone before it reaches your DAW
Dual headphone outputs support collaborative recording
ADAT expansion allows up to eight additional inputs
IO Pro software enables routing and real-time plugin processing
Together, these tools create a workflow that is simple, flexible, and deeply musical.
A good interface should disappear once the music begins.
The Harrison 32Ci is designed exactly that way—clean signal path, musical filters, flexible monitoring, and intuitive controls that let creators focus on performance instead of troubleshooting.
Whether you’re recording vocals, producing electronic tracks, or capturing a full band, the 32Ci offers a powerful balance of classic console tone and modern studio convenience.
Plug in. Dial the gain. Shape the sound.
And let the music speak.
Subscribe to our mailing list to stay up to date with the latest product news, updates, and information.